Casting
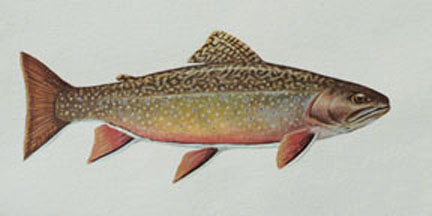
Brook Trout
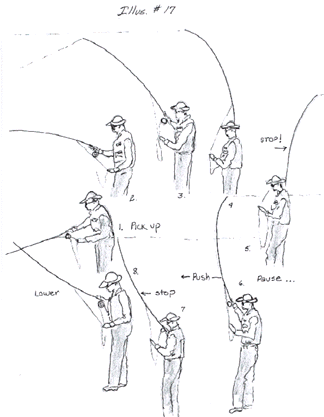
A tennis player has to smash a tennis ball in mid air while stretching over a boundary line. The trajectory of the ball must be placed in a small rectangular area on the opponent’s side. A baseball batter has to assess the velocity, angle and drop of a ball fired sixty feet away at speeds upwards to ninety miles an hour. But for starters, all a beginning caster has to accomplish is to lift a fly line over his head and cast a fly twenty feet away with a somewhat soft landing. Like any skill one wants to become proficient in, there are rarely any short cuts. I would recommend viewing the 3M videotape, Beginning Fly Casting, with Doug Swisher. I also recommend a two week casting program on your lawn, which I will outline later in this unit, and finally I recommend reading Fly Fishing Strategy by Doug Swisher and Carl Richards.
The activities in this unit should not be skipped, as they will provide the learner with a visual framework as well as a mental conception of the basics of fly casting. Throughout this unit on casting instruction, the learner should demonstrate, in a freeze-stop action, all the basic principles of casting before, during and at the conclusion of each casting lesson.
Goal of the Basic Straight Line Cast
The goal of the basic straight line cast is to deliver a fly to a predetermined target with a gentle landing such as a real insect would do. Follow these three simple rules for dry fly fishing: 1. keep the fly high and dry, 2. cast in such a manner as to avoid line drag, which drags the fly at an unnatural speed, and 3. present your fly with a soft landing.
Once you learn the basic cast, you will be catching fish and ready for more efficient casting techniques. Almost everyone can learn to become a proficient caster for short distances. And speaking of distance, having fly fished for over forty years and guided for fifteen, I contend that ninety percent of the fly fishers catch ninety percent of their fish on casts less than thirty feet. Accuracy and presentation are far more important than how far you can cast a line. What follows is a discussion of the principles of casting.
The first step in understanding the basics of the straight line cast is to understand the power arc and loop control. With this knowledge, proficiency will be a matter of fine tuning. Too often, however, adult males fall victim to the mistaken belief that random trial and error will eventually pay off. Often the male ego takes over and the beginning male caster convinces himself that with more muscle power he can compensate for his lack of finesse. Nothing could be further from the truth. Let the rod do the work!
The Hand Grip
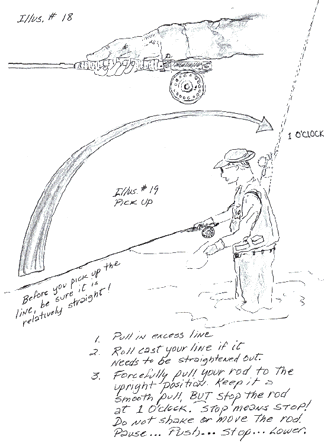
It is the preferred grip for the beginner and advanced caster. Regarding the old bug-a-boo about use of the wrist, many of the experts stress the use of this hand grip and then cocking the wrist a split second before you reach the stopping point at one-o-clock. I have no quarrel with the experts; I have just never seen a beginner who could accomplish this feat. I recommend not using ANY wrist action initially until you experience what the rod is capable of producing through forearm movement only. From my experience, most beginners fail to stop on the invisible 1 o'clock and 11 o'clock mark primarily from use of the wrist. Learn the forearm movements and stop points before incorporating use of the wrist. If the rod is pointed back too far through over use of the wrist, the forward cast will be fraught with problems. During each casting lesson, look up and locate the 1 and 11 o'clock stop points.
A beginning caster can cast thirty feet with a rigid forearm cast; however, once you understand and can feel the dynamics of rod flex and loop control, the split-second wrist action to complete the stop points is essential in casting longer distances. Try both techniques to experience what is most comfortable, but do remember to stop where you are supposed to stop which is ________ o'clock on the back cast and _______ o'clock on the forward cast. Note: As you become a better caster, you will successfully break these somewhat rigid rules, especially in regard to the use of the wrist. Overuse of the wrist is the most common error of beginning casters. One of the best resources for learning to cast is in a local fly fishing club. Members are always enthusiastic at helping new members. Many clubs even have scheduled casting clinics. You may also attend a class sponsored by numerous organizations.
The Pickup
The starting point for any cast is with the pick up of your line as you move into your back cast position. Straight lines provide instant tension to the rod which "loads" up the rod similar to a pole vaulter. The more slack you have in your line, the more you are going to have to bring your rod back behind you. When you bring your rod back too far in the back cast behind you, your line will be directed downwards to the water or shoreline. In as much as possible, you are attempting to keep the line traveling in a straight line. If you miss your stop point or pause to long, your line collapses. The consequence for this is snagging bushes, popping your fly off or dumping your line in front of you, similar to plopping a pile of spaghetti in a bird bath.
Keep in mind that gravity, angle of the rod tip and line speed determine what type of forward cast you will make. Always begin your cast with a straight line pick up from the water. If need be, pull in those loose coils and false cast until you have regained your desired length of cast.
Loop Control
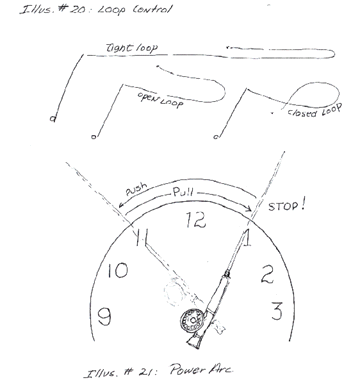
The perfect loop is said to be tight, as the loop will be parallel with the top portion and the bottom portion of the loop. Such a loop can only be achieved by almost instantaneous stops at the two stop points in the power arc. This is followed by a pause as the line or loop extends. Just as the loop is about to extend into a straight line, the caster powers the line in the opposite direction. An open loop is created when the rod extends, in either direction, beyond the stop points which are _______ o'clock on the back cast and ______ o'clock on the forward cast. An open loop is wind resistant and results in a loss of energy. A tailing loop is when the loop is so open the fly at the end of the loop collapses and during the forward cast a knot is created somewhere in the leader. We sarcastically refer to these knots as "wind" knots. Keep in mind that a "wind" knot reduces the strength 50%.
False Cast
The false cast is a cast which repeats the procedure of casting the fly line backwards and forwards until the caster has accomplished one of the three following goals: 1. false casting to dry the fly off, 2. letting out line to increase the distance of the cast, and 3. false casting to change or shift to a new target area or to gauge the distance to your targeted area. Speaking of targets, always cast to a very specific spot. Eye and hand coordination and distance computation trains the brain.
Unlike a spinning rod and reel where the weight of the lure pulls out the monofilament line, in fly fishing the weight of the line is catapulted forwards or backwards through the bending and flexing of the rod. Think of pole vaulters of the modern era. It wasn't until the advent of the fiberglass pole that the 12 foot mark was surpassed. In the days of the rigid pole, the vaulter relied almost exclusively on speed and upper body strength. However, with the introduction of the fiberglass pole, vaulters could capitalize on the bend and flexing motion of the pole. In effect, the weight of the vaulter bending the pole backwards loaded up the pole for the forward thrust. This is similar to the weight of a fly line as it loads up the rod for the transfer of energy.
Review:
1. Demonstrate the hand grip.
2. Define a false cast.
3. Provide three reasons for using a false cast
4. Demonstrate the best starting position for a pick up.
5. Why is it important to pick up a straight line rather than loose coils?
6. Demonstrate the stopping position for the back cast and the forward cast.
7. Draw a picture of a tight loop, and then briefly explain why the tight loop is every caster's goal.
Activity 1: Rod Flex
With your partner, go out to a clear casting spot on a lawn. Pull out twenty feet of line behind you. The beginning caster should hold the rod with one or two hands in the 1 o'clock position, allowing the partner to pull back the line until the rod bends in a good bow. The partner should then release the line. Note how far the line traveled forward just on the stored energy in the rod. Next, the partner should yell "go" just as he releases the line. The caster should now follow forward with the rod. What was the result? From this activity you should get the feel for what the rod will do on its own when it is "loaded up" and ready to fire!
Activity 2: Pick Up
Extend about thirty feet of line out in front of you in loose, serpentine coils. Position the rod at the ten o'clock position. Quickly pull the rod backwards to the 1 o'clock position and allow the line to fall behind you. Describe the results. Now, extend the thirty feet of line out in front of you on the grass in a straight line. Position the rod so that the tip of the rod is almost toughing the ground. Quickly pull the rod backwards to the 1 o'clock position and stop on a dime! Allow the line to fall behind you. What were the results? How was this different from your first attempt?
Note: In order to be successful, you must stop at the stop points without shaking the rod or stopping momentarily and then continuing past the stop point. Just as no means no, stop means STOP!
Activity 3: False Cast
Pull out about twenty feet of line, and tie a small piece of bright yarn to the tippet. Or tie on a bright fly, but be sure to cut off the hook portion. Stand sideways and practice the false cast. Just as the loop is about to unfold behind you, push the rod to the forward stop position and vice-versa. Your goal will be to form a fairly tight loop. This can only be accomplished through brisk speed up and stop action of the rod. Remember, the more line you have out, the longer you will pause as you wait for the loop to uncurl. I would suggest four or five false casts at a time, and then start over. If you are learning on your own, invite someone to critique your cast. Explain the stop points and the goal of a tight loop.
Casting Lesson #1
Photo needed
Now that you have experimented with developing a tight loop with a false cast, you are ready for the basic straight line cast. For this lesson you will need a level stretch of lawn with no obstacles to impede your casts. You will need two old plates. Find a starting point and place the two plates at a distance of twenty feet and thirty feet. Use a seven and a half foot leader with a 2X or 3X tippet. Tie on a #8 or #10 white wing fly. Be sure to remove the hook.
After you have practiced this lesson a few times, record your daily results on a Record Sheet. Practice twenty minutes every day for ten days and note your progress. Your goal is to be able to place your fly, in a straight line, within 12 inches of your target. Follow these directions:
1. Your first target will be the 20 foot target. This is a short
cast which you will often duplicate on small streams or creeks. (Keep
in mind that when fishing a small creek, you should wade right up the
middle of the creek and make short casts right in front of you. In this
situation, you don't even have to let the fly line drag on the water. )
Lay your rod down behind your border line. Pull out enough line so that
the fly lies in the center of the plate. Return to the casting point
and make a pick up and deliver cast to the center of the plate. Make no
false casts. Make five casts and record the point value for each of the
five casts.
1. Touching the plate = 200 points
2. Within 12 inches = 150 points
3. 12 inches to 2 feet = 100 points
4. 2 feet to 3 feet = 50 points
5. Beyond 3 feet = 0 points
2. Your second target will be the thirty foot target. Start out this
cast with the fly lying somewhere between the two targets (plates).
Holding your rod in the pick up position, lift your line up and false
cast until you have the correct range. The fewer the false casts the
better, as with each false cast you increase the odds of missing a
stopping point. Drop your fly on the target. Make five casts and record
the point value for each of the five casts. Remember, each of these
five casts must include a false cast. Now, add up the point values for
all ten casts and divide by ten.
95 - 100 = Expert -- Future tournament caster
80 - 94 = Hot Shot! Hurry up and get ready for the real thing -- you're ready!
70 - 79 = Good Sport -- You are a caster who may later proclaim, " It isn't how many fish you catch that counts, but how many casts you can make in day!"
50 - 69 = Back Cast Muffer -- Oops! More practice ahead!
Casting Lesson #2
Photo
Now you are ready for casting on water. Practice casts with gentle landings. Vary your casting distances with false casts. Start each lesson with a review. Your goal should be an accurate twenty to thirty foot cast. Parents, a child's goal should be learning to master a very short cast on a creek with good line control.
Casting Lesson #3: The Roll Cast:
Photo
In addition to the basic straight line cast, mastery of the roll cast is essential if you want to step on to the playing field against rocks, grass, logs, bushes and trees. Mother Nature impishly plays her tricks on the fly fisher. I imagine her whispering to the choke cherry, "Look, he even turned around to check his distance. Catch his fly on the next cast. Elderberry, be ready. A brown's feeding, and you can tell he's excited. You might be the one. Get ready...grab it." I swear I hear whispering chuckles in the underbrush when I snag a tree top.
So, how do you counter this backdrop of snagging opportunists who gleefully wait to steal our flies? The answer is a roll cast. And speaking of having your fly caught in a branch, here is a technique for retrieving the fly providing you can reach the fly with the end of your rod tip. Push the rod tip up to enclose the fly and shake.
When you are on a stream or brushy creek, and you have trees or brush or a steep bank behind you, roll out your fly in front of you. Pull in any excess line. Lift the rod, in a steady pull, up to the 1 o'clock position. At this point the line should start to lift out of the water directly in front of you and form a sagging curve beneath your arm pit. The line on the water should be straight as you pull it towards you. As your casting hand passes your head, speed up the ascent of the rod until your whole arm is extended upwards with the rod still maintaining the 1 o'clock stop position. (Do not pull all of the line out of the water as the surface tension of the water on the line creates the smooth turn over of the loop.)
When your arm is raised high, drive your forearm downwards and slightly forward using a little wrist action. Stop at the 9 o'clock position. This forward thrust creates a rolling loop which will completely turn over the line and fly. Longer rods make this cast easier as does a double-tapered fly line. Start out with short roll casts.
Casting Lesson 4: Mending the Line
Earlier I espoused three dogmatic principles of dry fly fishing. Do you remember them? Just as you recalled, the three basic principles of dry fly fishing are 1. Make an accurate cast with a gentle landing, 2. Keep your fly high and dry, and 3. Keeps your fly floating at the natural speed of the water.
Photo: flyonwater
Keeping your fly floating at the natural current speed provides opportunities to catch fish. If you have line drag, you will not catch fish. You may violate rule one and drown a dry fly and catch the occasional small fish. I am sure on the bell shape curve of fish intelligence, a few dumb fish are out there. I know that occasionally you can even smash down a tiny fly on a smooth surface of water and catch a fish. Nonetheless, it is a rare occasion when a trout will rise to inspect a fly traveling faster than the speed of the water.
Trout are creatures of their environment. Like all creatures, they must take in enough food to meet their daily needs as well as to build up fat reserves for the winter months. Survival is measured in calorie intake measured against energy expended. Trout hold in feeding lies and await the food to reach them. Only under slow water conditions will a trout roam the waters in search of food.
A trout is not going to expend more energy that what the food source will provide. Reaching the trout with an accurate presentation is imperative. Having been a guide many years, I am still reluctant to tell a client the truth when he says in exasperation, "I can't understand it. I'm casting right to them!" Missing a feeding lane by a foot is missing a hook-up by a mile.
No matter how difficult it is to catch them at times, trout are simple creatures. They are conditioned by their environment as to what they will eat and when they will eat. If they are selectively feeding on one hatch, they will rarely take anything else until the hatch has waned. Having said that, it is also true that they are often opportunistic and take a #12 Royal Wulff right in the middle of a trico hatch. To use the vernacular of my high school students, "Go figure!" Frequently, however, they do develop a selective feeding rhythm.
Picture the trout in a feeding lie looking up to the surface at his window of feeding opportunity. More than likely the position he holds is one which affords little expenditure of energy. Keying into a particular hatch, he slowly rises and slurps a floating dun or a struggling caddis fly. The current carries him backwards and he gently fins downwards to his previous position. Over and over he repeats this pattern. Suddenly, an unparalleled event takes place. A bug, for that he is sure of, speeds across his field of vision leaving a rooster tail wake. Shocked, the trout broods over the anomaly, becomes sullen and looses his appetite.
Mending the Line
Photo: mendingtheline
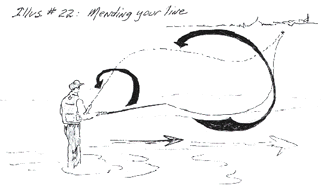
Exaggeration aside, an artificial which speeds faster than a natural floating insect will rarely trigger a reflex action from the trout. A fly will speed up when the faster current drags the mid section of the fly line downstream. This causes the artificial fly, which has just landed in slower water, to accelerate down stream. When this happens, the faster current pulls the line into an outline of a belly. The trick is to flip this "belly" upstream so that it delays interfering with the natural drift of your fly. Although an experienced fly caster can counter this condition with a specialized cast, the beginner can mend the line as soon as the line lands on the water.
To mend your line, pull in any slack line. Lower the rod to the point where you are almost touching the water with the tip of your rod. Flip up the belly of the line using a 3/4 circle motion with your wrist. The surface tension of the water on your line and leader generally keeps the fly from moving to any degree. Remember, when you provide a drag free float, you are fishing. When you are "fishing" with line drag, you are only traumatizing fish by altering the metaphysical laws of their universe.
(For fly fishing from a drifting boat, read …)
Slack Line Cast
Photo: slacklinecast
The slack line cast or S curve cast or snake cast is an effective cast when you are casting to a target downstream. In order to keep your fly from running out of line and being dragged under the water, use the slack line cast which leaves a serpentine or S curve effect on your line. This loose line then allows the fly to float naturally downstream to the targeted area before the line straightens out and drags the fly under the water. To accomplish the S curves in your line, abruptly stop your forward cast at 11 o'clock. Having already left some excess line dangling by your side, vigorously shake your rod side to side as you shoot out the slack line. Lower the rod tip to 9 o'clock.
Reach Cast
Photo: reachcast
After you have learned to mend your line, use the reach cast to essentially mend the line in the air. Picture yourself in the middle of a stream looking at a feeding fish up close to the bank where the water is very slow. The water is flowing from the left to the right of you. If you cast slightly upstream from this fish, the faster water in front of you will immediately begin to drag your fly too fast. The fly drops on target, speeds up, and the trout is spooked. The next time you will know that you have to flip the belly of the line upstream. In this manner the fly has a chance to float naturally over the targeted spot.
The reach cast changes the direction of the mid section of the fly line without altering the position of the landing fly relative to your target. To accomplish this nifty trick, you must cant your rod as little as possible during the forward cast. Stop the forward thrust at 11 o'clock. Rather than lower the rod to 9 o'clock, shift the upright rod across your chest in an upstream motion with a little wrist action. It sounds more difficult than it is. I did, however, give up on my attempts to illustrate this motion. The bulk of the line will land with the belly slightly upstream and to the left if you are a right handed caster facing the opposite bank. This maneuver will provide three or four seconds of extra drag-free drift.
Go to Step 5: Basic Fly Patterns and Presentation
Visit Dave's companion site, Fishing Tips 101.

Leave a comment